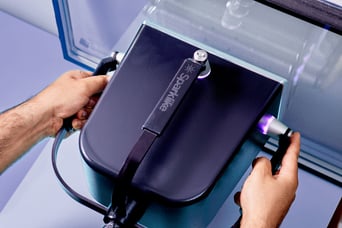
Sparklike Specialists conduct regular quality assurance protocol procedures for our non-destructive insulating glass gas fill devices to extent the product life and guarantee trustworthy results. This blog post dives deeper into the Sparklike Laser™ quality assurance protocol, which is divided into two main procedures 1) the in-house quality test procedure and 2) annual calibration and maintenance service for Sparklike devices™. These two procedures are closely connected since the in-house quality test procedure offers insight into how important the annual calibration and maintenance of quality control equipment is.

The technology behind all Sparklike devices™ is Sparklike owned and patented, and therefore we consider these regular quality assurance protocol procedures highly important. In a nutshell, Sparklike Laser™ product line (formerly known as Gasglass Laser) allows for the analysis of insulating gas concentration of the triple and double-glazed units. Measurement is also possible through most coatings and laminated glasses. The Sparklike Laser devices use TDLAS laser technology to measure the oxygen content inside an IGU. The oxygen reading is then digitally converted by the device to show the amount of insulating gas, like argon or krypton, present in the measured IGU.
In-House Quality Test Procedure
To better understand the need for annual calibration of any equipment, let alone for devices that are used daily for quality control, a good starting point is comparing the device’s measurement accuracy before and after the device has undergone appropriate calibration and maintenance procedures. For this reason, the before and after testing approach has become the core of our in-house quality test procedure. Similar in-house tests are conducted also for our Sparklike Handheld™ device. You can access the blog post by clicking this link.
The in-house quality test procedure for Sparklike Laser devices is conducted followingly: First we use three different types of insulating glass units (IGU) where each IGU is filled with pre-mixed 90% Argon gas continuously. These units are our reference IGUs and acts as a base to the tests made with Sparklike Laser device. Then, to ensure an adequate sample size for ensuring measurement quality during testing, each of the test IGU:s are measure 20 times from both sides. The tolerance for the tests is ± 2%. If the dispersion is high, the optics is adjusted accordingly.
A Case Example of the Quality Test
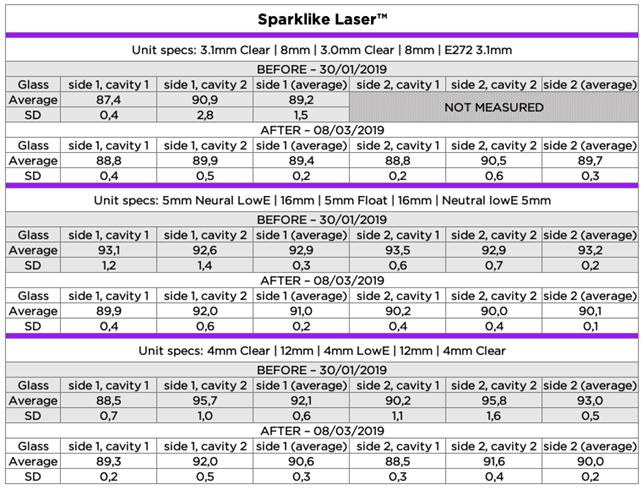
This particular in-house quality test procedure consisted of three different triple glazed insulating glass units with the following specs:
- 3.1mm Clear | 8mm | 3.0mm Clear | 8mm | E272 3.1mm
- 5mm Neutral LowE | 16mm | 5mm Float | 16mm | Neutral LowE 5mm
- 4mm Clear | 12mm | 4mm LowE | 12mm | 4mm Clear
The table below shows Sparklike Laser™ test results before (dated on the 30th of January 2019) and after the device has undergone calibration and maintenance (dated on the 8th of March 2019). Furthermore, average, and standard deviation (SD) values are calculated from the measurement results. These values are used to interpret and compare test results before and after service/calibration.

In this example, the Sparklike recommended annual calibration and maintenance had been ignored and the device had not been in for maintenance or calibration for over 2-years. Therefore, before maintenance most of the average results did not fall into the expected values that Sparklike have set for Sparklike Laser™ in-house quality test procedure. However, after the calibration and maintenance, measurement precision improved on average by 1,1% for cavity 1, by 2,6% for cavity 2 and by 2,1% for the average value. In addition, before maintenance, the deviations were significantly higher than prior to calibration and maintenance. Demonstrating the importance of annual maintenance and calibration. The improvements in precision presented above have been calculated in percentage points. To sum up, the Sparklike Laser™ in-house quality test procedure clearly highlights the necessity for annual calibration and maintenance.
Sparklike’s Production Manager says “As for Sparklike Laser™ devices, it is crucial to service and check the control parameters and the optics of the device annually. Furthermore, this state-of-the-art measurement device also contains several moving components that require regular maintenance. Without annual service, there can be a significant shift in the measurement results.”
Annual Calibration and Maintenance Service
In addition to these regular in-house quality test protocols, the devices should be serviced annually. When the devices arrive for annual maintenance, Sparklike Engineers start the maintenance process by first testing the device’s operations. As a general procedure, this means checking the parts for wear and tear defects. After testing the device’s operations and replacing the most common wear and tear elements, Sparklike Engineers will perform an inspection and adjustment of optics.
Next, the Sparklike devices™ are calibrated by checking the reference measurements. If any variances occur, necessary actions will be taken to fine tune the device. This means analyzing the reference measurements and comparing the measurement reading and adjusting the optics until the insulating gas concentration readings are within the acceptable tolerance. At this stage, several hundreds of measurements are being conducted using different references and methods to secure the reading accuracy. Click the following links to continue reading what happens during Sparklike calibration.
As an example, the Sparklike Laser™ device presented in this blog post did not contain any defects. Therefore, the following maintenance procedures took place: Sparklike Specialists ran the software updates, optics adjustment which means the laser beam was re-focused and re-adjusted, and the device calibrated.
Innovation and Development At Sparklike
Lastly, as an innovation-driven Nordic company, we at Sparklike are constantly developing our devices and services. The development is not happening during regular device maintenance, development, but ideas and different observations about the Sparklike Laser™ devices are made. Therefore, maintenance and calibration impact the development to enhance the devices’ operational reliability and performance.
“A good example of such developmental improvement is the updated reflector added during regular device maintenance. This small improvement has led to an important increase in test result repeatability. With these simple enhancements, the Sparklike Laser™ devices experience increase in reliability and measurement accuracy,” Production Manager concludes. Therefore, one can say and the Sparklike Laser quality assurance procedure is a comprehensive protocol that impacts on the functionality of the device but also can spark some new ideas what the next generation of Laser could include.


